As I promise, here I'll uploaded my image for Tutorial 3.You can see below:
1) I,m choosed Valcouver Image and start to open the word SAVING.I,m create the alpha channel and start using Pen Tools.I,m using this tools because to draw a pixel- based line across text.Before thatI make a new layer from selected path and fill with black: click alt and backspace.

2) Next, I click to the channel area and the background become red color.I place the image (money) over text layer.

3) I use the Group with previous Layer Command to group layer in the Layers Palette.I make it 5 copies of the money.

4) And it become like this but it is not done yet.A few steps i need to add here..As you can see the word SAVING its over the image.Wait..i'll change it
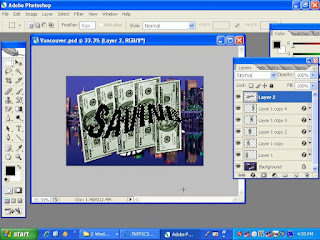
5) Now you can see the differences.Its something like magician..well,i 'll try to duplicate each layer to inverst the money inside the word SAVING.By click in the middle to duplicate and start inverst.

6) Finished?Opps..not yet.I change the color of the sky to purple plus the building by do Hue/Saturation Technique and Magic Wand Tool
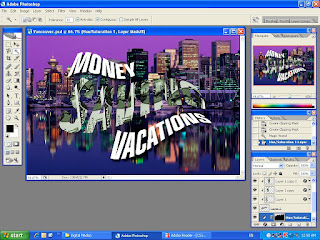
7) I go to the filter and choose Render and click the Lighting Effect and choose Triple Spotlight

8) Finally,my outcome is look like this ( the image can be in night mode or up to your creativity)
Is it interesting? I believe you guys can do more creative from this image.I,m also promise to do my best!!i'll believe

I'LL PROCEED TO NEXT TUTORIAL WITH A NEW LEARNING AND TECHNIQUE.


0 comments:
Post a Comment