? ??????????????Party Monster? ????? ?? ???Rating: 3.7 (3 Ratings)??7 Grabs Today. 1749 Total Grabs. ?????
?Preview?? | ??Get the Code?? ?? ?????Big 'Ol Boomers? ????? ?? ???Rating: 4.5 (2 Ratings)??7 Grabs Today. 2058 Total Grabs. ??????Preview?? | ??Get the Code?? ?? ???????Colors Col BLOGGER TEMPLATES - TWITTER BACKGROUNDS ?

Saturday, July 26, 2008

Tutorial 4

Salam n hello everyones..here i,m back again to posted my next tutorial.For this week I will learn about liquid effects


1) The first steps we need to do is open the imgae n choose Rust..here we go..enjoy n very interesting tutorial.


Then we need to view n choose Actual Pixel


2) Then ,, we need to choose Gradient Overlay to begin and create liquid effects in LAYER STYLES.We need to choose colors in Gradien Editor and adjust the Gradient Angle.

Then the layer become like this...


3) Next , we need to select the Inner shadows , drop shadow , outer glow and use global light and adjust the settings.Adjust smoothing , altitude , opacity , add contour and sets in range.


4) We need to adjust the smoothing , altitude and opacity, add the contour and set its ange.Then drag the layer into Styles Palette and name it. We need to click style and apply it to another selected layer.

5) After that we need to duplicate, make it blur and adjust levels of Green channel, define as pattern & use it as a texture.


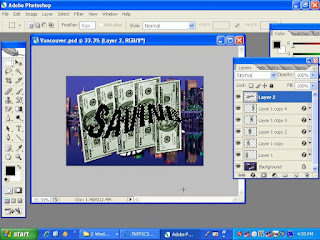
6) This image show the blur...


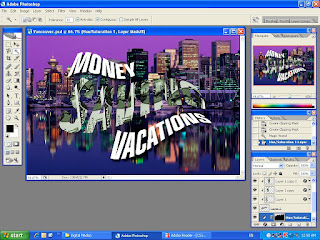
7) Then we need to set layer blending options to blend interior effects as a group and reduce and fill opacity.This is the final image after followed the process..


How is it?interesting right? OK...you can see the next tutorial by next week with a new methods n concepts..SEE YA...have a nice days to all of you!!


Tuesday, July 22, 2008

Welcome to Tutorial 3

As I promise, here I'll uploaded my image for Tutorial 3.You can see below:


1) I,m choosed Valcouver Image and start to open the word SAVING.I,m create the alpha channel and start using Pen Tools.I,m using this tools because to draw a pixel- based line across text.Before thatI make a new layer from selected path and fill with black: click alt and backspace.


2) Next, I click to the channel area and the background become red color.I place the image (money) over text layer.


3) I use the Group with previous Layer Command to group layer in the Layers Palette.I make it 5 copies of the money.


4) And it become like this but it is not done yet.A few steps i need to add here..As you can see the word SAVING its over the image.Wait..i'll change it


5) Now you can see the differences.Its something like magician..well,i 'll try to duplicate each layer to inverst the money inside the word SAVING.By click in the middle to duplicate and start inverst.


6) Finished?Opps..not yet.I change the color of the sky to purple plus the building by do Hue/Saturation Technique and Magic Wand Tool


7) I go to the filter and choose Render and click the Lighting Effect and choose Triple Spotlight


8) Finally,my outcome is look like this ( the image can be in night mode or up to your creativity)
Is it interesting? I believe you guys can do more creative from this image.I,m also promise to do my best!!i'll believe

I'LL PROCEED TO NEXT TUTORIAL WITH A NEW LEARNING AND TECHNIQUE.


Tutorial2

Hello everyones..opss Mdm.I'll already deletd this previous posted because i need to edit it and the comments from you also deletd.Huhu..

1) First of all I need to choose the image.Here, we are provided with three images n choose one.


2) Next, i need to change it with greyscale.I need to create a new layer first then go to Hue/Saturation technique to change the color.Here we go..


3) Actually, I'll do it two three times to color the image by using Pen Tools and followed with Hue/ Saturation Technique.By double click the image from path area(select) and go to the channel and create alpha and the image have been selected.Then go to Layer and start to choose Hue/Saturation Tehcnique and the pop-up screen have been appeared and I need to choose and click colourize and automatically the background color have been change.You can choose your favaourite colors here.First, I change the color of the car from green( you can see the differences from previous and now) to tourquise.I like this color actually..its nice to look.And on your right handside you can see the alpha channel that i've been created.


4) Then I change the lady hair,shirt and pants,followed with his folder.


5) I make it a bit difference by add the effects.I choose filter menu--> Render-->Lighting Effects and i also choose the DROP SHADOW.


6) Finally the image is become like this:

THAT'S ALL -I,M PROCEED TO NEXT TUTORIAL; WITH A NEW TECHNIQUES.CHECK IT OUT!!